The "It Actually Listened" Moment - ESP-Claw tutorial
I typed a message on my phone: "Blink the onboard LED 3 times."
I hit send.
And the LED blinked. Three times. Exactly as I asked.
No code written. No IDE opened. No compilation errors. No "upload failed" messages.
Just a conversation with my ESP32.
That's the magic of ESP-Claw — a framework that turns your ESP32 into an AI assistant that listens, understands, and executes your commands in plain English.
This video is hosted by YouTube. It loads only when you press play, and YouTube may then set cookies. Watch on YouTube
What Is ESP-Claw? (The 30-Second Explanation)
ESP-Claw is an AI agent framework for IoT devices developed by Espressif. It lets you control hardware using natural language through chat apps like Telegram .
Think of it like this:
| Traditional Coding | ESP-Claw (Chat Coding) |
|---|---|
| Write C++/Lua code | Type plain English commands |
| Compile and upload | AI generates code automatically |
| Debug for hours | AI handles errors |
| Need coding skills | No coding required! |
ESP-Claw runs locally on the device, handling sensing, reasoning, decision-making, and execution on the edge . It's like having a robot that actually listens to you.
What You'll Need - ESP-Claw tutorial
| Component | Specs | Price (USD) |
|---|---|---|
| DFRobot ESP32-S3 AI Camera (DFR1154) | OV3660, 8MB PSRAM, mic, speaker, IR night vision | $30-35 |
| USB-C Data Cable | Must support data transfer | $5-10 |
| Telegram App | Free | $0 |
| LLM API Key | OpenAI, Claude, DeepSeek, etc. | ~$5-10 |
The board is the star. It has:
✅ Camera (OV3660, 160° wide angle)
✅ Microphone (I2S PDM)
✅ Speaker (MAX98357 amplifier)
✅ IR LEDs for night vision
✅ Ambient light sensor

Quick Buy Links (Affiliate) - ESP-Claw tutorial
| Component | Where to Find |
|---|---|
| DFRobot ESP32-S3 AI Camera (DFR1154) | DFRobot Official |
| USB-C Data Cable | Amazon |
| External LED Kit | Amazon |
| Breadboard & Jumper Kit | Amazon |
Step-by-Step: How to Set Up ESP-Claw
Step 1: Flash the Firmware (No Coding Required!) - ESP-Claw tutorial
1.1 Go to the ESP-Claw Web Flasher (link in description)
1.2 Connect your ESP32-S3 AI Camera board via USB-C
1.3 Click "Connect" and select your board
1.4 Choose the firmware for your board model
1.5 Enter your WiFi credentials (SSID + password)
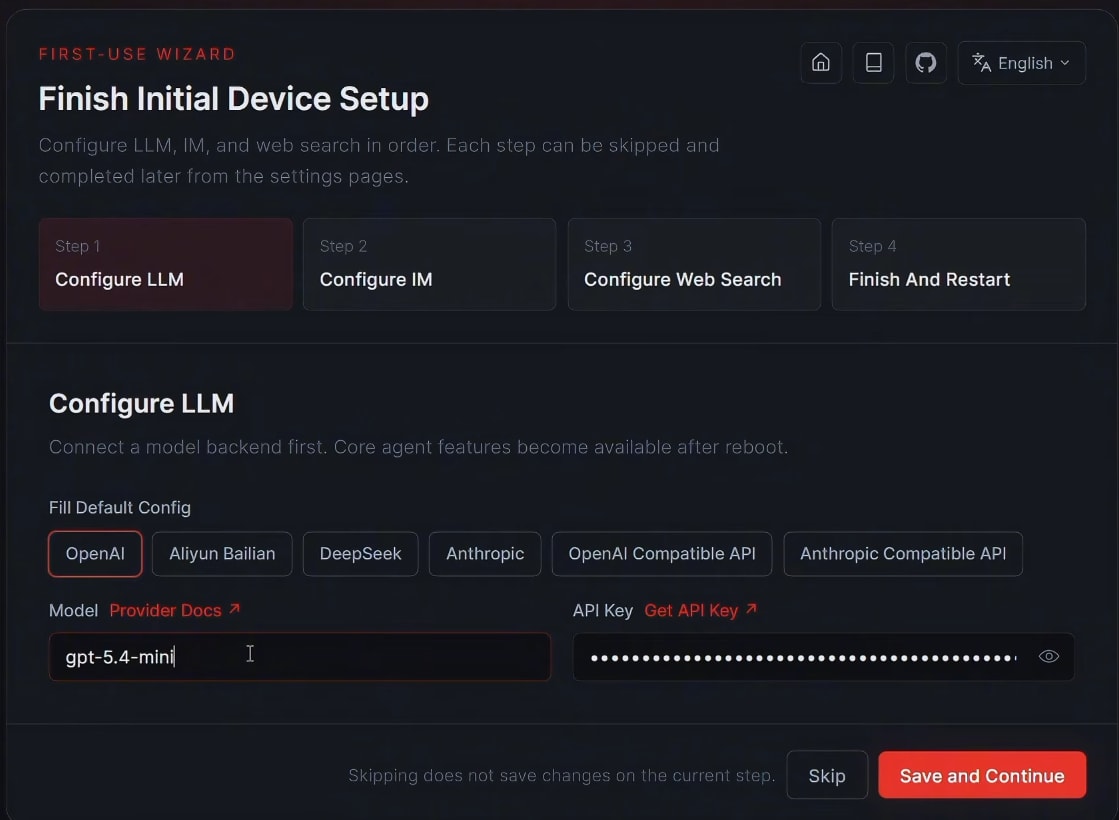
1.6 Enter your LLM API key (OpenAI, Claude, DeepSeek, or Qwen)
1.7 Configure your chat app (Telegram, QQ, Feishu, or WeChat)
1.8 Click "Flash" and wait
1.9 Press the RST button after flashing completes

Step 2: Connect to Telegram - ESP-Claw tutorial
2.1 Open Telegram and search for @BotFather
2.2 Create a new bot and get your Bot Token
2.3 Paste the token into the ESP-Claw configuration page (at 192.168.4.1)
2.4 Start chatting with your ESP32!
What Can You Actually Do With It?
Here are the demos I tested — and they all work:
Demo 1: Blink the Onboard LED - ESP-Claw tutorial
Command: "Blink the onboard LED 3 times"
Result: LED blinks exactly 3 times
Behind the scenes: ESP-Claw's AI writes a Lua script, executes it, and the LED responds — all without you writing any code .
Demo 2: Control an External LED - ESP-Claw tutorial
Command: "Blink the LED on GPIO 44 5 times"
Result: External LED blinks 5 times
Wiring: Connect an LED through a 220Ω resistor to GPIO 44 (available on the Gravity connector)
Demo 3: Take a Photo - ESP-Claw tutorial
Command: "Take a photo and send it to me"
Result: The camera captures an image and sends it to your Telegram chat
Hardware: The OV3660 camera captures 2MP images with excellent clarity
Demo 4: Play Audio Through the Speaker - ESP-Claw tutorial
Command: "Play a happy tune on the speaker"
Result: The built-in speaker plays a sound
Audio specs: The board includes an I2S amplifier (MAX98357) and speaker interface
How ESP-Claw Works (Behind the Scenes)
| Step | What Happens |
|---|---|
| 1. You speak | Type a command in Telegram |
| 2. AI processes | The LLM interprets your request |
| 3. Code is generated | AI writes Lua code for the task |
| 4. Script executes | ESP-Claw runs the Lua script locally |
| 5. Hardware responds | LED blinks, camera captures, speaker plays |
ESP-Claw uses Lua as the primary on-device language for programmable automation . The AI can write scripts (lua_write_script) and run them (lua_run_script) in real-time .
The magic: The LLM decides what to do, emits Lua code, saves it, and executes it — all in milliseconds .
Why This Board is Perfect for ESP-Claw
| Feature | Why It Matters for ESP-Claw |
|---|---|
| 8MB PSRAM | Runs Lua scripts and AI processing smoothly |
| Camera + Mic + Speaker | Full input/output for AI interactions |
| IR Night Vision | Works in complete darkness |
| Gravity Connector | Easy external sensor expansion |
The ESP32-S3 chip supports neural network computation and signal processing, making it ideal for local AI tasks .
Troubleshooting - ESP-Claw tutorial
| Problem | Likely Cause | Fix |
|---|---|---|
| Board not detected in web flasher | Wrong USB cable | Use a data-capable cable, not charging-only |
| No response from Telegram | WiFi not connected | Check WiFi credentials in config at 192.168.4.1 |
| Camera capture fails | FPC cable loose | Reseat the camera ribbon cable |
| No sound from speaker | Volume too low | Try "Play a loud sound" command |
| LED commands not working | Wrong GPIO pin | Onboard LED is GPIO 3 |
What's Next? - ESP-Claw tutorial
Once you've mastered ESP-Claw, the possibilities are endless:
| Project Idea | What You'll Need |
|---|---|
| Voice-Controlled Assistant | Board + microphone + speaker |
| AI Security Camera | Board + PIR sensor + Telegram alerts |
| Smart Home Hub | Board + external sensors |
| Gesture-Controlled Robot | Board + motors + servo |
The best part? You can do all of this without writing code. Just chat with your ESP32 and tell it what to do.
🎥 Watch the Complete Video Tutorial - ESP-Claw tutorial
See the full tutorial with live demos — LED blinking, camera capture, speaker playback, and more:
📺 I TALKED to My ESP32 and It LISTENED! 🤯 ESP-Claw + AI Camera Tutorial
👉 Don't forget to Subscribe to Roborear on YouTube for more robotics and AI tutorials every week!
Your Turn - ESP-Claw tutorial
This project taught me that you don't need to be a programmer to make hardware do cool things. With ESP-Claw, the AI handles the code — you just have to talk.
Now go build yours. Chat with your ESP32. Blink LEDs. Take photos. Play sounds.
And when someone asks how you did it, tell them you just asked.
Frequently Asked Questions (FAQ)
Frequently Asked Questions
1. Do I need to know how to code to use ESP-Claw? - ESP-Claw tutorial
No! That's the whole point of ESP-Claw. You communicate with your ESP32 using natural language through chat apps like Telegram. The AI generates the necessary Lua code automatically based on your commands . You can build projects, control LEDs, take photos, and play sounds—all without writing a single line of code.
2. Which ESP32 boards are compatible with ESP-Claw? - ESP-Claw tutorial
ESP-Claw requires at least 8MB Flash and 8MB PSRAM . Supported chips include ESP32-S3 and ESP32-P4 . The DFRobot ESP32-S3 AI Camera (DFR1154) is an excellent choice because it includes a camera, microphone, speaker, and IR night vision . Other compatible boards include M5Stack CoreS3 and LilyGo ESP-Claw variants .
3. Is ESP-Claw free to use? Does it require ongoing fees? - ESP-Claw tutorial
ESP-Claw firmware and framework are open-source and free . However, you'll need an API key for the LLM service you choose (OpenAI, Claude, DeepSeek, etc.). Most services offer free tiers or low-cost access ($5-10 initial credit). You can even run a local LLM with tools like LM Studio to avoid cloud costs entirely . There are no ongoing subscription fees for ESP-Claw itself.
Tags