Table of Contents
The Package That Confused Me
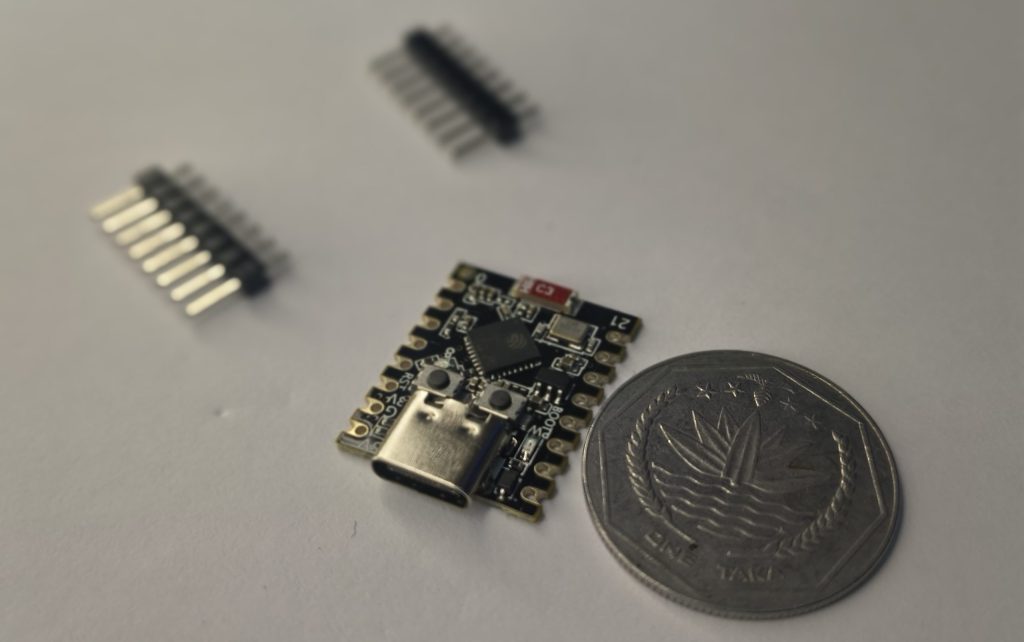
A few weeks ago, a tiny package arrived at my doorstep. Inside was something so small I almost lost it in the packaging material.
I held it up and thought: “This… this is a microcontroller? It’s smaller than my thumb.”
For comparison, here it’s next to my Arduino Uno:
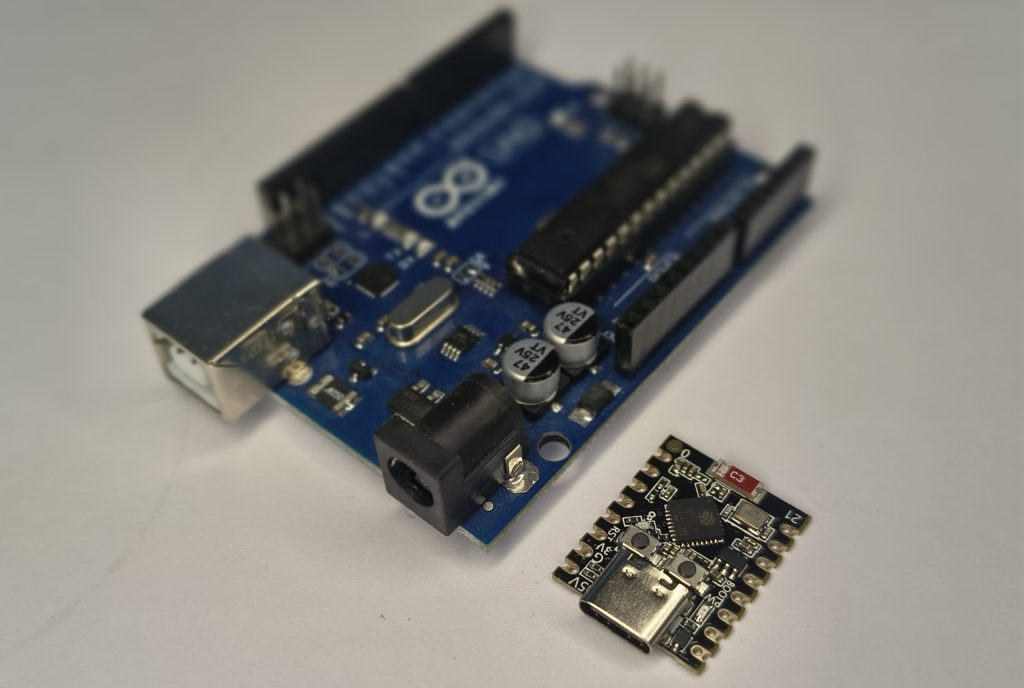
This little guy is the ESP32-C3 Super Mini. And after spending a few weeks with it, I have Thoughts.
Wait, What IS This Thing?
Let’s start with the basics. The ESP32-C3 Super Mini is a development board built around Espressif’s ESP32-C3 chip. Here’s what you’re getting in this tiny package:
The headline: It’s a RISC-V chip running at 160 MHz with WiFi and BLE built in, all for less than the ESP32-C3 Mini Price of a decent meal out.
If you’re searching for ESP32 C3 Mini options, this is currently one of the best value boards available.
ESP32-C3 Super Mini Pinout
Before we go further, let’s look at the ESP32-C3 Super Mini pinout. This is crucial for your projects:
| Pin Number | Function | Notes |
|---|---|---|
| GPIO0 | Boot mode | Used for uploading |
| GPIO1 | TX | Serial output |
| GPIO2 | RX | Serial input |
| GPIO3 | ADC | 12-bit ADC |
| GPIO4 | ADC | 12-bit ADC |
| GPIO5 | ADC | 12-bit ADC |
| GPIO6 | ADC | 12-bit ADC |
| GPIO7 | ADC | 12-bit ADC |
| GPIO8 | Built-in LED | Inverted! LOW = ON |
| GPIO9 | BOOT Button | Also usable as input |
| GPIO10 | GPIO | Available |
| GPIO20 | GPIO | Available |
| GPIO8 (SDA) | I2C Data | For OLED/sensors |
| GPIO9 (SCL) | I2C Clock | For OLED/sensors |
| 3V3 | 3.3V output | Power sensors |
| GND | Ground | Common ground |
| 5V | 5V input | USB power |
Important: The ESP32-C3 Super Mini pinout has the LED on GPIO8 and it’s inverted. This catches everyone off guard!
Where to Buy (International Links)
Here are the best places to grab one online:
| Platform | Price | Notes | Link |
|---|---|---|---|
| AliExpress | ~$3-4 | Cheapest option, shipping takes 2-4 weeks | ESP32-C3 Super Mini on AliExpress |
| eBay | ~$3.98 + shipping | Good seller ratings | ESP32-C3 Super Mini on eBay |
| Amazon | Varies | Faster shipping, often in multi-packs | ESP32-C3 Super Mini on Amazon |
Also grab these essentials:
- USB-C Data Cable (make sure it’s not just a charging cable!) -> https://s.click.aliexpress.com/e/_c4Wla4QT
- Breadboard Kit with jumper wires -> https://s.click.aliexpress.com/e/_c42iXi6L
- TP4056 Charging Module if you want battery projects -> https://s.click.aliexpress.com/e/_c4L5bsE3
*Note: Some AliExpress listings offer “free shipping” but delivery can take 3-5 weeks. Amazon is faster but costs a bit more.*
Why I Got Excited About This ESP32 C3 Mini
I’ve been playing with Arduinos for a while. They’re great. But every time I wanted to add WiFi to a project, I had to:
- Use an Arduino Uno + ESP8266 (messy wiring)
- Or buy an ESP32 board that was physically huge
- Or deal with weird voltage level issues
The ESP32-C3 Super Mini solves all that. It’s got WiFi built-in, it’s 3.3V logic (consistent with modern sensors), and it’s SO SMALL.
Plus, it’s RISC-V. Not because I care deeply about open-source instruction sets (I’m an ME student, I just want things to work), but because it feels like the future. Every time I use this ESP32 C3 Mini, I feel vaguely cutting-edge.-source instruction sets (I’m an ME student, I just want things to work), but because it feels like the future. Every time I use it, I feel vaguely cutting-edge.
What is RISC-V?
RISC-V (pronounced “risk-five”) is an open-source, royalty-free Instruction Set Architecture (ISA) based on Reduced Instruction Set Computer principles. It allows anyone to design, manufacture, and sell customizable processor cores without licensing fees, making it a popular alternative to ARM and x86 in embedded systems, IoT, and increasingly, AI and high-performance computing.
The ESP32-C3 Super Mini is your cheapest entry into RISC-V with WiFi.
First Impressions: The Good
1. The Size Is Ridiculous
I cannot overstate how small this ESP32 C3 Mini is. It’s 22mm × 18mm. That’s it. You could hide it behind a coin. You could tape it inside a project box and forget it’s there. You could lose five of them in your desk drawer and not notice.
For anyone searching for ESP32 C3 Mini for compact projects (wearables, sensors, hidden smart home stuff), this is a dream.
2. USB-C
Finally. No more hunting for that one specific Micro-USB cable that actually transfers data. USB-C works both ways, charges faster, and I have approximately 47 cables lying around.
3. The ESP32-C3 Super Mini Price
At around $3-4 on AliExpress, this is insane value. The ESP32 C3 Mini price is unbeatable. For comparison, a single Arduino Uno clone costs more and has no WiFi.
👉 https://s.click.aliexpress.com/e/_c2xRT4R9 [Check current price on AliExpress]
👉 https://www.ebay.com/sch/i.html?_nkw=esp32-c3+super+mini [Find deals on eBay]
4. Arduino IDE Support
Here’s the best part: it works with the Arduino IDE. You don’t need to learn a new environment. If you’ve used an ESP32 before, you already know how to use this ESP32 C3 Mini.
First Impressions: The Weird
1. The LED Situation (ESP32-C3 Super Mini Pinout Quirk)
The onboard blue LED is connected to GPIO8. Not pin 13 like you’re used to. Not the built-in LED constant. GPIO8.
And here’s the kicker—check the ESP32-C3 Super Mini pinout carefully: it’s inverted. digitalWrite(8, HIGH) turns it off. LOW turns it on. That confused me for a solid 10 minutes.
2. The BOOT Button Dance
There’s a BOOT button connected to GPIO9. This is great for input experiments, but it also means entering download mode requires knowing the ESP32-C3 Super Mini pinout for boot mode.
The exact sequence:
- Hold BOOT button
- Press and release RESET
- Release BOOT button
- Board enters download mode
Sometimes uploads just work. Sometimes you have to do the dance. It’s… quirky.
3. USB Detection Can Be Fussy
The ESP32 C3 Mini uses a native USB interface, not a separate USB-to-serial chip. In theory, this is cleaner. In practice:
- You need to enable “USB CDC On Boot” in Tools menu to see Serial output
One Amazon reviewer noted: “Sometimes it can be hard to get these into Boot mode where a port gets assigned to them. Like they say, press and hold Boot button down while briefly pressing Reset button, then release Boot button.”
4. Quality Control Lottery
I have to be honest: there are reports of inconsistent quality. One Amazon customer who bought a 3-pack reported:
“I ordered a pack of 3 of these, two came stuck together as the PCB’s weren’t separated at the factory. Easy fix, snapped them apart. But all 3 of the ones I ordered came with a bad factory firmware… Seems to be a product that has low QC at the factory and you may encounter problematic batches.”
I got lucky—mine works fine. But it’s worth knowing when you check the ESP32 C3 Mini price that you might need to try a different seller if you hit problems.
The WiFi Signal Thing
The ESP32-C3 Super Mini uses a tiny ceramic antenna. In my testing, it works fine within a room. But some people report weak signal.
Some versions come with an external antenna option. The OLED version on AliExpress includes a ceramic antenna and built-in display
Setting Up Your ESP32 C3 Mini (So You Don’t Have To Struggle)
Here’s the step-by-step that actually works:
In Arduino IDE:
- Add ESP32 support
- File → Preferences
- Additional Board Manager URLs:
https://espressif.github.io/arduino-esp32/package_esp32_dev_index.json
- Install ESP32 boards
- Tools → Board → Boards Manager
- Search “ESP32” and install the one by Espressif
- Select your board
- Tools → Board → ESP32C3 Dev Module
- (Or “Nologo ESP32C3 Super Mini” if available)
- CRITICAL: Enable USB CDC
- Tools → USB CDC On Boot → Enabled
- Without this, Serial.print won’t show anything
- Select port
- Tools → Port → (your COM port)
First Test: Blink (The Correct Way for ESP32-C3 Super Mini Pinout)
cpp
// ESP32-C3 Super Mini Blink
// NOTE: Based on ESP32-C3 Super Mini pinout, LED is inverted!
// LOW = ON, HIGH = OFF

#define LED_PIN 8

void setup() {
  pinMode(LED_PIN, OUTPUT);
}

void loop() {
  digitalWrite(LED_PIN, LOW);   // LED ON (yes, LOW)
  delay(500);
  digitalWrite(LED_PIN, HIGH);  // LED OFF
  delay(500);
}
Upload this. If the LED blinks opposite of what you expected, now you know why—check that ESP32-C3 Super Mini pinout again!
WiFi Scan Example
Once you’ve got blink working, try the WiFi scan example:
cpp
#include "WiFi.h"

void setup() {
  Serial.begin(115200);
  WiFi.mode(WIFI_STA);
  WiFi.disconnect();
  delay(100);
}

void loop() {
  Serial.println("scan start");
  int n = WiFi.scanNetworks();
  Serial.println("scan done");
  if (n == 0) {
    Serial.println("no networks found");
  } else {
    Serial.print(n);
    Serial.println(" networks found");
    for (int i = 0; i < n; ++i) {
      Serial.print(i + 1);
      Serial.print(": ");
      Serial.print(WiFi.SSID(i));
      Serial.print(" (");
      Serial.print(WiFi.RSSI(i));
      Serial.println(" dBm)");
    }
  }
  delay(5000);
}
Cool Projects You Can Build
| Project | What You’ll Need |
|---|---|
| Weather station | DHT22 sensor, ESP32 C3 |
| Smart switch | Relay module |
| OLED display | 0.96″ OLED (I2C pins: SDA=8, SCL=9) |
| Battery sensor | TP4056 charger, 18650 battery |
The I2C interface is on pins 8 (SDA) and 9 (SCL). Perfect for adding displays or sensors—just remember your ESP32-C3 Super Mini pinout.
How It Compares
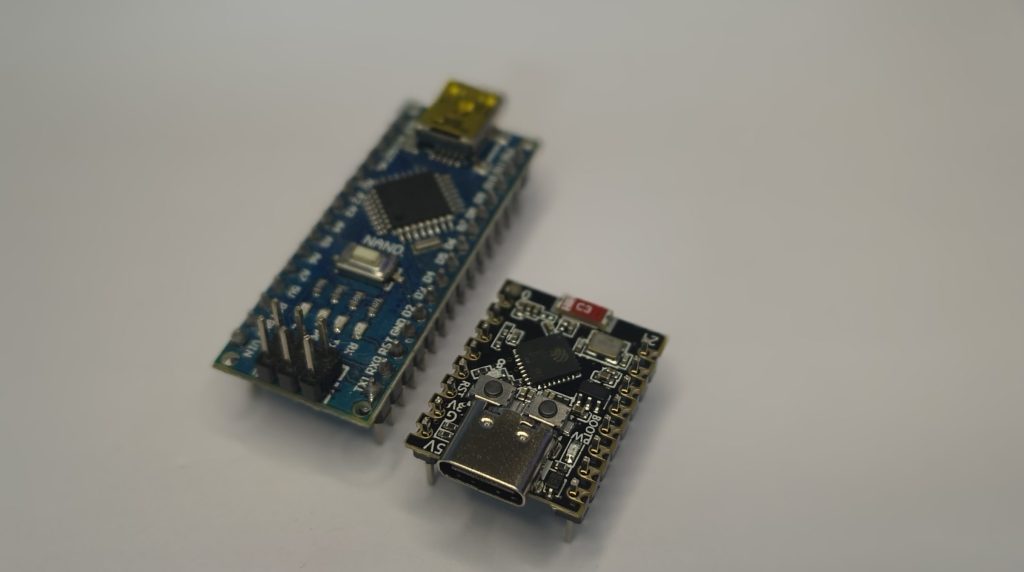
vs Arduino Nano
| Feature | ESP32-C3 Super Mini | Arduino Nano |
|---|---|---|
| CPU Speed | 160 MHz | 16 MHz |
| RAM | 400 KB | 2 KB |
| Wireless | WiFi + BLE | None |
| Size | 22×18 mm | 45×18 mm |
| ESP32 C3 Mini Price | ~$3-4 | ~$10-15 |
The Nano wins on 5V tolerance and simplicity. The ESP32 C3 Mini wins on everything else.
vs ESP8266 (NodeMCU)
- Similar ESP32 C3 Mini price range
- Similar wireless capability
- ESP32 C3 Mini wins on: BLE support, newer architecture, USB-C
- ESP32 C3 Mini loses on: Community resources (ESP8266 has years more tutorials)
ESP32-C3 Super Mini Price: The Bottom Line
Let’s talk ESP32 C3 Mini price honestly. You’ll find them ranging from $1.14 (bulk orders) to $10 (single units with faster shipping). The sweet spot is around $3-4 on AliExpress.
For that ESP32-C3 Super Mini price, you’re getting:
- 160 MHz RISC-V processor
- WiFi + BLE 5.0
- 4MB Flash + 400KB RAM
- USB-C
- Ridiculously small form factor
That’s why I keep recommending people check the ESP32 C3 Mini price—it’s unbeatable value.
The Honest Verdict
Should you buy one?
YES, if:
- You want WiFi/BLE in a tiny package
- You’re comfortable with 3.3V logic
- You enjoy exploring new tech
- You have a few dollars to experiment
NO, if:
- You want something that “just works” every time
- You need 5V tolerant pins
- You’re easily frustrated by quirks
For me? I love it. The size, the power, the RISC-V novelty—it’s exactly the kind of board that makes me excited to build things. Yes, it has quirks. Yes, the upload process sometimes needs the BOOT button dance. But for $3-4, I can forgive a lot.
Your Turn
Have you tried the ESP32-C3 Super Mini? Did you get a good one or a dud? Drop a comment and let me know—I’m genuinely curious how common the quality issues are.
And if you haven’t tried one yet… for $3-4, it’s worth the experiment.
👉 https://s.click.aliexpress.com/e/_c2xRT4R9[Grab one on AliExpress here]
— Shahrear, ME’24, BUET
(Currently trying not to lose this tiny board in my backpack)
FAQs
1. What is the ESP32-C3 Super Mini and what makes it special?
The ESP32-C3 Super Mini is an ultra-compact development board built around Espressif's ESP32-C3 chip. It features a 32-bit RISC-V single-core processor running at up to 160 MHz with integrated Wi-Fi and Bluetooth 5 (LE) . What makes it special is its ridiculously small size (22.52 × 18 mm—smaller than a postage stamp) combined with powerful wireless capabilities, all at an incredibly low price point . It's perfect for IoT projects, wearables, and space-constrained robotics applications.
2. What is the ESP32 C3 Mini price? How much should I pay?
The ESP32 C3 Mini price varies depending on where you buy and quantity :
AliExpress: $3–4 USD, Cheapest option, shipping takes 2–4 weeks
eBay: ~$3.98 + shipping, Good seller ratings
Amazon: $5–10 USD (single), Faster shipping, often in multi-packs
Bulk (10+): As low as $1.14 each, Direct from manufacturers
For reference, the official Espressif ESP32-C3-DEVKITM-1 costs around $15+ , making the Super Mini version an exceptional value. Just be aware that lower prices sometimes mean inconsistent quality control .
3. How do I upload code to the ESP32-C3 Super Mini? Why do I need to hold BOOT?
Uploading code requires putting the board into download mode :
1. Hold the BOOT button (GPIO9)
2. Press and release the RESET button
3. Release the BOOT button
4. Click Upload in Arduino IDE
This sequence forces the board into download mode. Some boards auto-reset for upload, but many require the "BOOT button dance" . If you're using ESP-IDF, you can also configure GPIO2, GPIO8, and GPIO9 strapping pins for automatic boot mode selection .
4. Why is my LED not blinking? (Or blinking opposite of what I expect?)
The onboard blue LED is connected to GPIO8 with inverted logic :
// CORRECT for ESP32-C3 Super Mini
#define LED_PIN 8
digitalWrite(LED_PIN, LOW);
// LED ON (yes, LOW)
digitalWrite(LED_PIN, HIGH);
// LED OFF
If you're used to HIGH = ON, this will confuse you at first. Always check the ESP32-C3 Super Mini pinout documentation – it's one of the most common "gotchas" .
Read my other blogs:
Affiliate Disclosure
Some of the links in this post are affiliate links. If you purchase through these links, I may earn a small commission at no extra cost to you. This helps support Roborear and keep the content coming. Thanks for your support!