
This video is hosted by YouTube. It loads only when you press play, and YouTube may then set cookies. Watch on YouTube
The "I Built My First Robot" Moment | ESP32 Platformio with VS Code for blink led
I still remember the first time I made an LED blink.
It wasn't the LED that excited me. It was the realization that I told a piece of hardware what to do, and it listened.
No magic. No mystery. Just code, a microcontroller, and a tiny light.
That moment changed everything. It was the first step toward RC cars, soccer bots, security cameras, and eventually a full robotics channel.
And today? That moment is yours.
Welcome to the Roborear Robotics Course. This is Episode 1. And by the end of this tutorial, you will have:
✅ A professional coding environment (VS Code + PlatformIO)
✅ Your first C++ program running on an ESP32
✅ A blinking LED (the "Hello World" of hardware)
✅ The foundation for every robotics project after this
This video is hosted by YouTube. It loads only when you press play, and YouTube may then set cookies. Watch on YouTube
Why ESP32? (And Why Not Arduino Uno?)
Let me be honest. The Arduino Uno is a great board. It's simple, it's everywhere, and it's perfect for learning.
But for real robotics? The ESP32 is simply better.
| Feature | Arduino Uno | ESP32 |
|---|---|---|
| Processor Speed | 16 MHz | 160-240 MHz |
| RAM | 2 KB | 520 KB |
| Flash Storage | 32 KB | 4-16 MB |
| Built-in WiFi | ❌ No | ✅ Yes |
| Built-in Bluetooth | ❌ No | ✅ Yes |
| Number of Pins | 20 | 25+ |
| Price | ~$20-25 | ~$5-7 |
| Best For | Simple projects, learning basics | Robotics, IoT, complex projects |
For a BUET mechanical engineering student building soccer bots? The ESP32 is the obvious choice.
In this course, we'll use the ESP32 for everything:
RC cars (wireless control)
Obstacle avoidance robots (sensors + motors)
Line followers (speed + precision)
Smart home devices (WiFi + Bluetooth)
But first? We blink an LED.
Check out my detailed review of the ESP32-C3 Super Mini -> The ESP32-C3 Super Mini: This Tiny Board Stole My Heart (And Yes, It Has WiFi)
What You'll Need (Under $10!)
| Component | Specs | Approx Price (USD) |
|---|---|---|
| ESP32 Development Board | Any version (30-pin or 38-pin) | $5.00 - $7.00 |
| USB Cable (Data Cable!) | USB-A to Micro-USB or USB-C | $2.00 - $4.00 |
| LED (Optional external) | 5mm, any color | $0.10 - $0.20 |
| 220Ω Resistor (Optional) | For external LED | $0.02 - $0.05 |
| Breadboard (Optional) | 400 points | $0.85 - $1.25 |
| Jumper Wires (Optional) | Male-to-male or male-to-female | $0.40 - $0.85 |
Total (with just ESP32 and cable): ~$7.00 - $11.00 USD
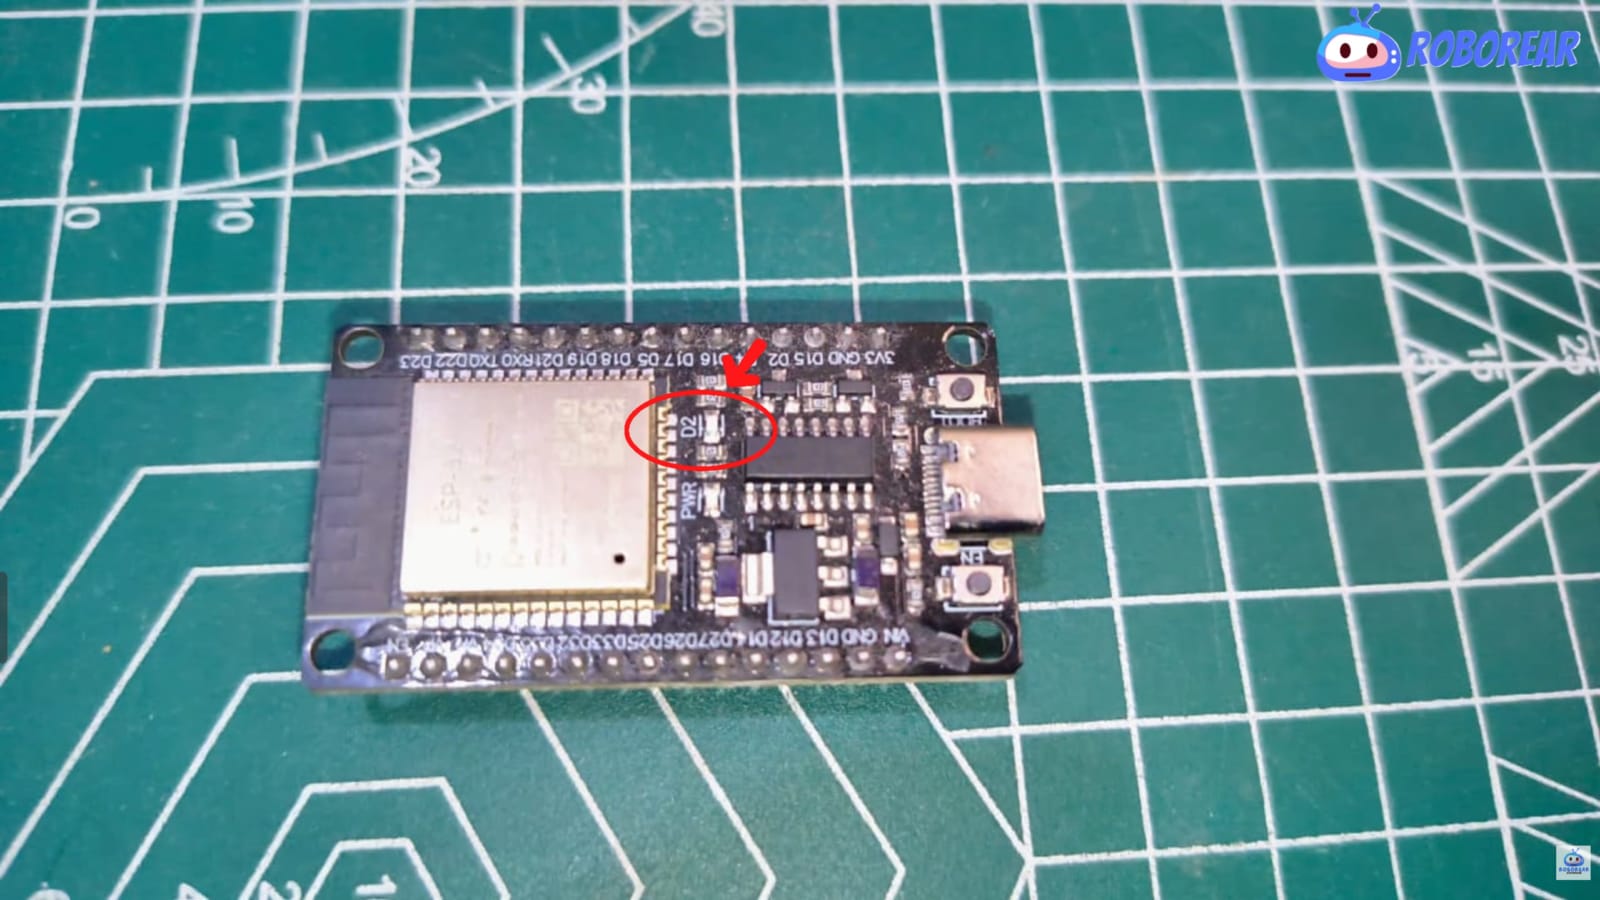
Note: Most ESP32 boards have a built-in LED on GPIO 2. You don't even need external components for this tutorial!
Quick Buy Links
| Component | Where to Find |
|---|---|
| ESP32 Development Board | AliExpress |
| USB Data Cable | AliExpress |
| LED Kit (Various Colors) | AliExpress |
| 220Ω Resistors (Pack) | AliExpress |
| Breadboard + Jumper Kit | AliExpress |
Why VS Code + PlatformIO? (Say Goodbye to Arduino IDE)
Most beginners start with the Arduino IDE. It's simple. It works. But it has limits.
| Feature | Arduino IDE | VS Code + PlatformIO |
|---|---|---|
| Autocomplete | ❌ Basic or none | ✅ Intelligent (IntelliSense) |
| Code suggestions | ❌ No | ✅ Yes (GitHub Copilot optional) |
| Project organization | ❌ Single file only | ✅ Multiple files + folders |
| Library management | ❌ Manual ZIP install | ✅ One-click library search |
| Git integration | ❌ No | ✅ Built-in |
| Multiple platforms | ⚠️ Limited | ✅ 1000+ boards |
| Professional tool | ❌ No | ✅ Yes (industry standard) |
For quick tests? Arduino IDE is fine.
For building robots, managing complex code, and learning professional tools? VS Code + PlatformIO is the answer.
I use VS Code for everything:
ESP32 robotics code
Python scripts for data analysis
Web development for Roborear
GitHub Copilot for AI-assisted coding
One editor. Everything in one place.
Step 1: Installing VS Code and PlatformIO
1.1 Download and Install VS Code
Go to code.visualstudio.com
Download the version for your operating system (Windows, Mac, Linux)
Install it (default settings are fine)
1.2 Install PlatformIO Extension
Open VS Code
Click the Extensions icon on the left sidebar (or press Ctrl+Shift+X)
Search for "PlatformIO IDE"
Click Install (it's the one with the little ant logo)
Wait for the installation to complete (it may take a few minutes)
1.3 Verify PlatformIO is Working
After installation, you'll see a new icon on the left sidebar (looks like an ant head)
Click it. You should see "PlatformIO Home"
Congratulations! You now have a professional embedded development environment.

Step 2: Creating Your First PlatformIO Project
2.1 Start a New Project
Click the PlatformIO icon (ant) on the left sidebar
Click "New Project"
Fill in:
| Field | What to Enter |
|---|---|
| Name | Blink_LED (or anything you like) |
| Board | Search and select DOIT ESP32 DEVKIT V1 |
| Framework | Arduino (this is the easiest for beginners) |
| Location | Keep default or choose your folder |
Click "Finish"
PlatformIO will now create your project and download the necessary tools. This may take a minute or two.

2.2 Understanding the Project Structure
Your project folder will look like this:
text
Blink_LED/
├── .pio/           (PlatformIO build files - don't touch)
├── .vscode/        (VS Code settings)
├── include/        (Header files - for advanced projects)
├── lib/            (Custom libraries - for later)
├── src/            (YOUR CODE GOES HERE!)
│   └── main.cpp    (This is where you'll write code)
├── platformio.ini  (Project configuration file)
└── .gitignore      (For Git version control)
For now, we only care about src/main.cpp and platformio.ini.
Step 3: Writing Your First Code (The Blink Sketch)
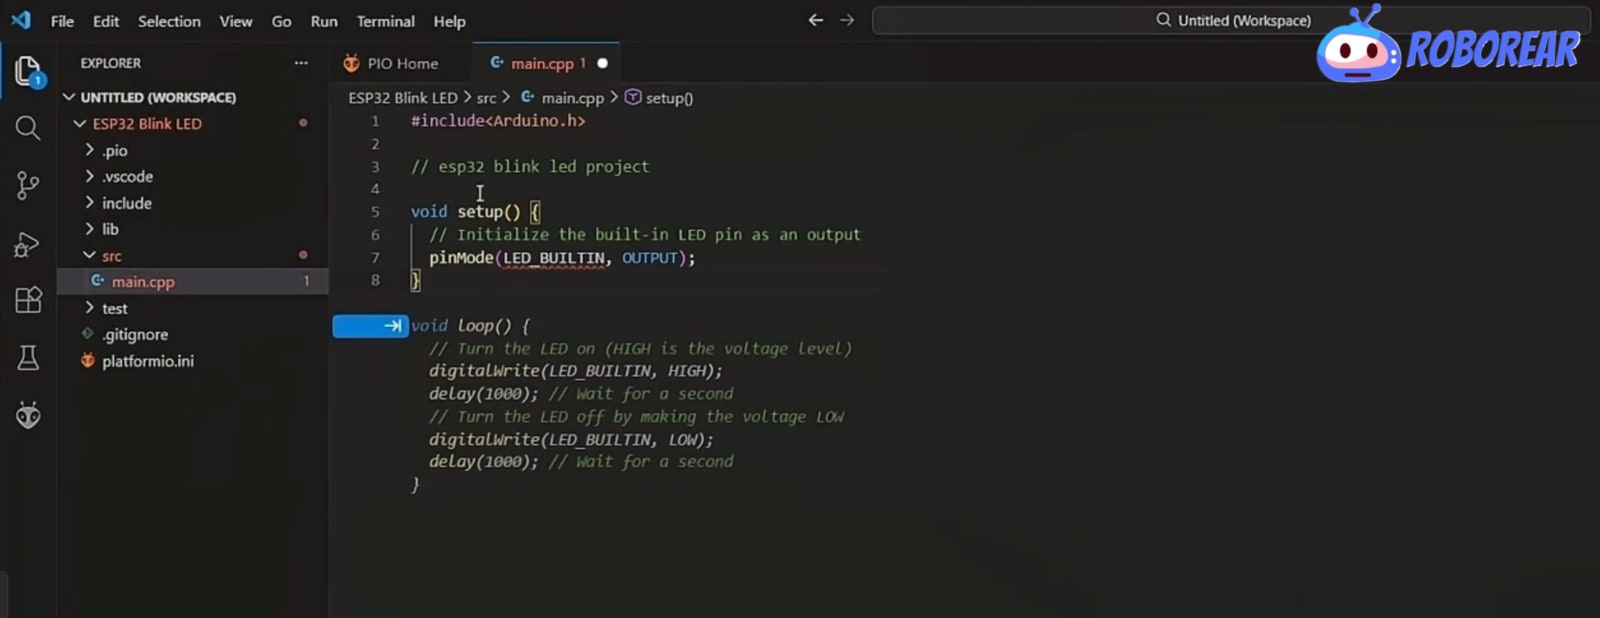
Open src/main.cpp. Delete everything in it. Copy and paste this code:
cpp
// ============================================================
// ESP32 Blink LED - First Robotics Program
// This blinks the built-in LED on GPIO 2
// ============================================================

// The setup function runs once when the board powers on
void setup() {
  // Initialize the built-in LED pin as an output
  pinMode(LED_BUILTIN, OUTPUT);
}

// The loop function runs repeatedly forever
void loop() {
  digitalWrite(LED_BUILTIN, HIGH);   // Turn the LED ON
  delay(1000);                       // Wait 1 second (1000 milliseconds)
  digitalWrite(LED_BUILTIN, LOW);    // Turn the LED OFF
  delay(1000);                       // Wait 1 second
}
If you haven't set up VS Code with PlatformIO yet, follow this guide first -> I Used Arduino IDE for 3 Months. Then I Found VS Code + PlatformIO and Never Went Back
What Each Line Means
| Code | What It Does |
|---|---|
| void setup() | Runs once when the board starts. Used for initialization. |
| pinMode(LED_BUILTIN, OUTPUT) | Tells the ESP32 that GPIO 2 is an OUTPUT pin (we want to send voltage out, not read it) |
| void loop() | Runs repeatedly, forever. This is where the action happens. |
| digitalWrite(LED_BUILTIN, HIGH) | Sends 3.3V to the pin. LED turns ON. |
| delay(1000) | Pauses the program for 1000 milliseconds (1 second) |
| digitalWrite(LED_BUILTIN, LOW) | Sends 0V to the pin. LED turns OFF. |
The result: LED on for 1 second, off for 1 second, repeating forever.
Step 4: Understanding the platformio.ini File
Open platformio.ini. It should look like this:
ini
[env:doit_esp32_devkit_v1]
platform = espressif32
board = doit_esp32_devkit_v1
framework = arduino
monitor_speed = 115200| Setting | What It Means |
|---|---|
| platform = espressif32 | We're using Espressif's ESP32 platform |
| board = doit_esp32_devkit_v1 | The specific board model |
| framework = arduino | Using Arduino framework (easiest for beginners) |
| monitor_speed = 115200 | Serial monitor baud rate (we'll use this later) |
You don't need to change anything here. Just know it exists.
Step 5: Connecting Your ESP32
5.1 Connect the Board
Plug your ESP32 into your computer using a USB cable.
Important: Use a data cable, not just a charging cable. Many USB cables only have power wires, no data wires. If your computer doesn't detect the board, try a different cable.
5.2 Select the Correct Port
In VS Code, look at the bottom status bar (blue bar at the bottom)
You'll see something like: COM3 or /dev/ttyUSB0 (depending on your OS)
If you don't see a port:
Windows: Check Device Manager under "Ports (COM & LPT)"
Mac/Linux: Try unplugging and re-plugging the board

Step 6: Uploading Your Code
6.1 Build and Upload
Click the "Upload" arrow (→) at the bottom of VS Code (next to the checkmark and plug icons)
Or press: Ctrl+Alt+U (Windows/Linux) or Cmd+Alt+U (Mac)
6.2 Watch the Terminal
A terminal panel will open at the bottom showing:
text
Processing doit_esp32_devkit_v1...
Compiling .pio/build/doit_esp32_devkit_v1/src/main.cpp
Linking .pio/build/doit_esp32_devkit_v1/firmware.elf
Checking size .pio/build/doit_esp32_devkit_v1/firmware.elf
RAM: [=== ] 8.2% (used 42808 bytes from 524288)
Flash: [= ] 6.1% (used 79602 bytes from 1310720)
Uploading...
6.3 The Moment of Truth
After a few seconds, you should see:
text
Leaving...
Hard resetting via RTS pin...
And on your ESP32, the blue LED should start blinking! ON for 1 second, OFF for 1 second.
(Photo: ESP32 with blue LED glowing)
6.4 Troubleshooting Upload Failures
If the upload fails, you might see a "Connecting..." message that hangs.
The Fix: Some ESP32 boards need to be put into "download mode" manually:
Hold down the BOOT button on the ESP32
Press and release the EN (Reset) button
Release the BOOT button
Try uploading again
This is normal for many ESP32 boards. After a few uploads, you'll get used to it.
Step 7: Optional - Adding an External LED
Want to blink an external LED? Here's how:
Wiring
| Component | Connect To |
|---|---|
| LED Anode (long leg) | GPIO 5 (or any free pin) through a 220Ω resistor |
| LED Cathode (short leg) | GND |
Modified Code
cpp
// Define which pin the LED is connected to
#define EXTERNAL_LED 5

void setup() {
  pinMode(LED_BUILTIN, OUTPUT);
  pinMode(EXTERNAL_LED, OUTPUT);
}

void loop() {
  // Blink built-in LED
  digitalWrite(LED_BUILTIN, HIGH);
  digitalWrite(EXTERNAL_LED, LOW);
  delay(500);

  digitalWrite(LED_BUILTIN, LOW);
  digitalWrite(EXTERNAL_LED, HIGH);
  delay(500);
}
Now the built-in LED and external LED will blink alternately!
Final Thoughts
Blinking an LED might seem small. But it's the first step toward building robots that move, see, and think.
Every expert was once a beginner. Every complex robot started with a single blinking light.
So take a moment. Watch that LED blink. You just programmed a microcontroller.
That's not nothing. That's everything.
Now go build something cool.
Ready to build something that moves? start with the ESP32 RC Car project -> Build Your Own ESP32 RC Car: Wireless Joystick Controller Guide for Beginners
FAQs
Frequently Asked Questions
1. Why is my ESP32 not connecting or showing "Failed to connect to ESP32"?
This is the most common issue beginners face. Here are the usual causes and fixes:
If the upload hangs at "Connecting...", your board is not in download mode. Hold the BOOT button, press and release RESET (EN), then release BOOT button. Then try uploading again.
If your computer doesn't detect the board at all, check that you're using a DATA USB cable, not just a charging cable. Many USB cables only have power wires. Try a different cable.
If you see "Access denied" or "Permission denied" on Mac/Linux, you need to give your user permission to access the serial port. On Linux, run: sudo usermod -a -G dialout $USER then log out and back in.
If nothing works, try a different USB port. Some computer USB ports don't provide enough power. A powered USB hub or direct motherboard port works best.
2. What's the difference between Arduino IDE and VS Code + PlatformIO? Which one should I use?
The Arduino IDE is simpler and great for absolute beginners or quick tests. You open it, write code, and upload in under a minute.
VS Code + PlatformIO is a professional tool that offers much more. You get intelligent autocomplete (IntelliSense) that suggests functions as you type. You can organize code into multiple files and folders, which is essential when projects grow beyond 200 lines. Library management is one-click – no more downloading ZIP files and manually installing them. You also get built-in Git integration for version control and GitHub Copilot support for AI-assisted coding.
My recommendation: Start with Arduino IDE for your very first blink. Then switch to VS Code + PlatformIO for Episode 2 and never look back. The learning curve is small, but the benefits are huge.
3. Can I use this tutorial with an Arduino Uno instead of ESP32?
Yes, absolutely. The code works on Arduino Uno with just one small change. The built-in LED on Arduino Uno is on pin 13, not GPIO 2. So change LED_BUILTIN to 13 or simply use pin 13.
The main difference is that the Arduino Uno has no built-in WiFi or Bluetooth, runs at 16 MHz (vs 160-240 MHz on ESP32), and has much less memory (2KB RAM vs 520KB). For simple blink and basic sensor projects, the Uno is fine. But for robotics projects like RC cars or obstacle avoidance robots, the ESP32's extra power and wireless capabilities make it the better choice.
The VS Code + PlatformIO setup also works perfectly with Arduino Uno. Just select "Arduino Uno" as your board when creating the project.
Tags